| Sterndrives.Com | Mercruiser Sterndrive Information | |||||
| 
 | 
| Rebuilding your Alpha One Lower Gearhousing Assembly. Most "Do-It-Yourselfer" customers would not attempt to rebuild an Alpha lower. The special tools required to do this job right are expensive. Extreme accuracy is required to build a drive that will last. The gears are spaced apart with the use of shims behind the bearing races. Precise measurements must be taken to insure exact clearances and one small error can destroy a new gearset. We suggest that you purchase a Service Manual before attempting such a repair. Even our most experienced Merc techs still refer to the manual when building a drive. Be Organized There are a lot of internal parts in an Alpha lower. Roller bearings, shims, seals, washers, gears and shafts must all be kept in neat order as so you can keep track of the procedures that you are doing. Use a good size work bench with large trays to place your parts in. It's good to have a "dirty parts" tray and a "clean parts" tray. The work space needs to have a large vise, a stand to place the drive in, a hydraulic press and a parts washer. It must be well lit and we recommend a good compressor with an air gun and air tools. Be Clean Make sure your shop area is CLEAN. Have all debris removed from the benches and floors. Have an oil pan to catch an dripping oil of greasy parts. Keep a good supply of lint-free towels near by. The Right Tools You can not build the drive without the right tools. Below is a list of tools required to build an Alpha One lower.  Backlash Indicator Rod 91-53459  Bearing Carrier Retainer Wrench 91-61069T  Bearing Preload Tool 91-14311A04  Belleville Washer 12-54048  Dial Indicator 91-58222A1  Dial Indicator Holding Tool 91-89897  Drive Shaft Nut Wrench 91-56775T  Drive Shaft Tapered Bearing Driver 91-87119   Included with 91-31229A7  Driver Cup 91-34379T  Driver Cup 91-36577T  Drive Shaft Bearing Retainer Tool 91-43506T  Needle Bearing Driver 91-33491  Oil Seal Driver 91-31108  Oil Seal Driver 91-44110  Pinion Gear Shimming Tool 91-56048T  Pinion Nut Adaptor 91-61067A3  Puller Bolt 91-85716  Puller Jaws (order 2) 91-46086A1  Shift Shaft Bushing Tool 91-31107T  Slide Hammer Puller 91-34569A1  Torque Wrench - Lb. In. 91-66274  Universal Bearing Removal and Installation Tool 91-31229A7  Bearing Adaptor 91-15755T  Bearing Driver 91-52393T   Included with 91-31229A7  Bearing Driver 91-32336   Included with 91-31229A7  Bearing Driver Rod 91-37323  Bearing Installation Tool 91-38628T  Collar 91-30366T1  Driver Head 91-36569T  Driver Head 91-37311   Included with 91-31229A7  Driver Head 91-37312   Included with 91-31229A7  Nut 11-24156  Pilot Washer 91-36571T  Pilot Washer 91-37324T  Pilot Washer 91-37350T  Plate 91-29310  Puller Head 91-36379   Included with 91-31229A7  Puller Rod 91-37229   Included with 91-31229A7  Puller Rod Head 91-32325T  Roller Bearing Removal and Installation Tool 91-37292  Washer 12-34961  Puller Rod 91-52394   Included with 91-31229A7  Universal Puller Plate 91-37241  Guide Plate 91-816243  Bearing Cup Installation Tool 91-18605A2  Shift Shaft Tool 75104A7  We also recommend the Heavy Duty Carrier Puller (see below) This tool is the best way to pull the carrier.   
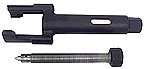
Trying to build an Alpha lower without even one of the above tools is almost impossible. We also recommend a Pressure Tester to pressure test the drive after it is assembled. Pressure checking the drive is a very important part of the assembly procedure. Time and time again we find leaks in newly assembled drives. As mentioned above, you will need some sort of drive stand. We use a drive stand made by Bob Kerr Tools. A complete Bob Kerr drive stand can cost well over $500.00. The stand is nice because you can rotate the drive into different positions. Otherwise, we have seen customers cut a "vee notch" in a work bench to slide the drive into. Whatever you use, it has to hold the drive FIRM and be strong. 
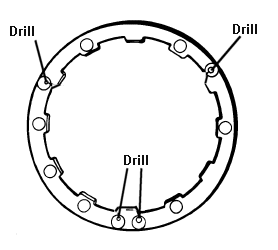
You will be torqueing the rear cover nut to 250 ft lbs. so it needs to be right. You will also need a good set of standard sockets, wrenches and screwdrivers, dead blow hammer and a long .025" feeler gauge. | 
 Remove the drain plugs and drain all the oil from the drive.
  Remove the drain plugs and drain all the oil from the drive. Place the gear shifter (remote control) into forward gear. The drive must be in forward gear or it will not come off. You will be removing the entire drive.
Unbolt the hydraulic trim cylinders and let them hang out of the way. Remove the six locknuts and remove the drive from the bell housing.
If the drive is stuck, lift it up and let it drop. The "slamming" of the drive dropping will usually break it free. Use CAUTION because when the drive
 comes free it could fall. The drive is heavy (about 75 pounds) and you can easily get injured. Supporting the entire weight of the drive by yourself could lead to a back injury. 
 Have a friend help you support the weight of the drive while removing it.
  Place the gear shifter (remote control) into forward gear. The drive must be in forward gear or it will not come off. You will be removing the entire drive.
Unbolt the hydraulic trim cylinders and let them hang out of the way. Remove the six locknuts and remove the drive from the bell housing.
If the drive is stuck, lift it up and let it drop. The "slamming" of the drive dropping will usually break it free. Use CAUTION because when the drive
 comes free it could fall. The drive is heavy (about 75 pounds) and you can easily get injured. Supporting the entire weight of the drive by yourself could lead to a back injury. 
 Have a friend help you support the weight of the drive while removing it. Place the entire drive in an adequate drive stand and remove the upper driveshaft
 housing from the lower gear housing. This is accomplished by removing all the nuts and the anode trim tab (zinc) along with the hidden allen bolt which
 is tucked up underneath the zinc anode. The zinc anode allen bolt requires a 3/8" allen wrench. The smaller hidden allen bolt located up underneath the zinc anode uses a 5/16" allen wrench.
  Place the entire drive in an adequate drive stand and remove the upper driveshaft
 housing from the lower gear housing. This is accomplished by removing all the nuts and the anode trim tab (zinc) along with the hidden allen bolt which
 is tucked up underneath the zinc anode. The zinc anode allen bolt requires a 3/8" allen wrench. The smaller hidden allen bolt located up underneath the zinc anode uses a 5/16" allen wrench. Lift off the upper housing and set it aside.
  Lift off the upper housing and set it aside. Get your "dirty parts tray" nearby as we are going to start setting old dirty parts into it.
  Get your "dirty parts tray" nearby as we are going to start setting old dirty parts into it. Remove the stainless flat washer that is located on the small splined shift shaft towards the front of the housing. Remove any tubes and slinger seals from on top of the plastic water pump housing. Remove the allen zinc anode bolt. Set everything in your "dirty tray".
  Remove the stainless flat washer that is located on the small splined shift shaft towards the front of the housing. Remove any tubes and slinger seals from on top of the plastic water pump housing. Remove the allen zinc anode bolt. Set everything in your "dirty tray". Use a 7/16" socket on a very long extension and remove the two 7/16" water pump nuts. Use a 1/2" socket on a long extension and remove the front 1/2" water pump nut. Use a 5/16" socket on a long extension and remove the rear water pump housing screw.
Lift off the top water pump housing, impellar and key. Remove the metal plate. Use two large slotted screw drivers and pry up from underneath the lower water pump base housing and remove it.
At this point you should be able to see the upper driveshaft bearing retainer ring. This retainer ring is threaded into the housing but do not remove it YET.
  Use a 7/16" socket on a very long extension and remove the two 7/16" water pump nuts. Use a 1/2" socket on a long extension and remove the front 1/2" water pump nut. Use a 5/16" socket on a long extension and remove the rear water pump housing screw.
Lift off the top water pump housing, impellar and key. Remove the metal plate. Use two large slotted screw drivers and pry up from underneath the lower water pump base housing and remove it.
At this point you should be able to see the upper driveshaft bearing retainer ring. This retainer ring is threaded into the housing but do not remove it YET. If you havn't already done so... remove the propeller and thrust washer. Most prop nuts use a 1-1/16" wrench.
  If you havn't already done so... remove the propeller and thrust washer. Most prop nuts use a 1-1/16" wrench. Use a large slotted screw driver and a hammer and bend straight the locking tabs that lock the large diameter threaded cover nut into the housing. Use the Bearing Retainer Wrench and remove the threaded cover nut.
 The threaded cover nut is located right in front of where the prop mounts. It's about 4" in diameter and looks like an inverted "castle nut". Usually the cover nut is corroded into the threads of the housing. It can be very difficult, if not impossible, to remove. Fear not! We have some tricks. 
 The most common (and easiest) method is to use a large impact wrench. Shops usually use a large 3/4 drive impact wrench. A standard 1/2" impact wrench might work but you will have to work at it. We usually heat up the circumference of the case with a torch. Careful!  An acetylene torch can melt the aluminum housing very easily. Use a "rose-bud" flame tip on your torch.
  Even a little portable propane or map gas torch can help. Heat lamps also work very well.
  Use a large slotted screw driver and a hammer and bend straight the locking tabs that lock the large diameter threaded cover nut into the housing. Use the Bearing Retainer Wrench and remove the threaded cover nut.
 The threaded cover nut is located right in front of where the prop mounts. It's about 4" in diameter and looks like an inverted "castle nut". Usually the cover nut is corroded into the threads of the housing. It can be very difficult, if not impossible, to remove. Fear not! We have some tricks. 
 The most common (and easiest) method is to use a large impact wrench. Shops usually use a large 3/4 drive impact wrench. A standard 1/2" impact wrench might work but you will have to work at it. We usually heat up the circumference of the case with a torch. Careful!  An acetylene torch can melt the aluminum housing very easily. Use a "rose-bud" flame tip on your torch.
  Even a little portable propane or map gas torch can help. Heat lamps also work very well.
 Stop and inspect the threads in the housing. This could "make or break" your plan. If the threads are corroded away too badly, the housing will have to be replaced. The threaded cover nut has to be torqued to over 200 ft. lbs and if the threads
 are corroded away, it won't hold. The cover nut will strip out and the propshaft bearing carrier will not be held into the case. If the threads look really eaten away, you are having a bad day. It might be better to buy a complete factory remanufactured Alpha One for about $2900 instead of trying to build a unit that won't stay together.
  Stop and inspect the threads in the housing. This could "make or break" your plan. If the threads are corroded away too badly, the housing will have to be replaced. The threaded cover nut has to be torqued to over 200 ft. lbs and if the threads
 are corroded away, it won't hold. The cover nut will strip out and the propshaft bearing carrier will not be held into the case. If the threads look really eaten away, you are having a bad day. It might be better to buy a complete factory remanufactured Alpha One for about $2900 instead of trying to build a unit that won't stay together. Now for the hard part... pulling out the propshaft bearing carrier. The Mercruiser Manual instructs you to use the long 2-jaw puller to pull the carrier out while pushing against the end of the propshaft. In real life, this usually isn't that easy. Your propshaft bearing carrier has been corroding in place for years and years. 
 Chances are good that the carrier is corroded into the housing and stuck in place. Using the recommended 2-jaw puller will usually rip apart the rim of the carrier. Once that rim is ripped off, it is near impossible to get the carrier pulled out of the housing. 
 We now sell the Super Heavy Duty Bearing Carrier Puller (see below). It's  $280.00 but worth every penny. 
 If you aren't ready to spend the money of the tool, go ahead and gently try to use the long 2-jaw puller (see tool list above).
  Now for the hard part... pulling out the propshaft bearing carrier. The Mercruiser Manual instructs you to use the long 2-jaw puller to pull the carrier out while pushing against the end of the propshaft. In real life, this usually isn't that easy. Your propshaft bearing carrier has been corroding in place for years and years. 
 Chances are good that the carrier is corroded into the housing and stuck in place. Using the recommended 2-jaw puller will usually rip apart the rim of the carrier. Once that rim is ripped off, it is near impossible to get the carrier pulled out of the housing. 
 We now sell the Super Heavy Duty Bearing Carrier Puller (see below). It's  $280.00 but worth every penny. 
 If you aren't ready to spend the money of the tool, go ahead and gently try to use the long 2-jaw puller (see tool list above).  
  When the carrier finally comes out, it should come out with the reverse gear attached. Sometimes the reverse gear stays stuck in the housing. This sucks. There is a fat metal ring between the reverse bearing and the gear that gets stuck in the housing.
  There are many tricks for removing the gear, most don't work. The best thing to do is soak... heat.... soak... heat... tap... tap... heat... soak.... heat.. etc.
  I have seen techs spend hours and hours only to give up. Again, this might be a good time to consider purchasing a complete factory remanufactured Alpha One for about $2900.00.
  When the carrier finally comes out, it should come out with the reverse gear attached. Sometimes the reverse gear stays stuck in the housing. This sucks. There is a fat metal ring between the reverse bearing and the gear that gets stuck in the housing.
  There are many tricks for removing the gear, most don't work. The best thing to do is soak... heat.... soak... heat... tap... tap... heat... soak.... heat.. etc.
  I have seen techs spend hours and hours only to give up. Again, this might be a good time to consider purchasing a complete factory remanufactured Alpha One for about $2900.00. Now it's time to loosen the pinion nut on the bottom of the driveshaft. Insert your Pinion Nut Adaptor Wrench as so it fits properly onto the pinion nut. You might have to lift the driveshaft and turn until it goes into place. 
  This next part is tricky. Place the Drive Shaft Nut Wrench on the top splines of the driveshaft and get a large wrench to fit it. IF you attempt to unthread the nut by turning the shaft, the nut will spin in the lower tool. This will round off the nut and open a can or worms. Before unthreading the nut, take your propshaft bearing carrier (the thing you pulled out earlier), 
  reverse it around and slide it over the propshaft and into the case backwards. This will hold the propshaft firm and reduce the chance or you rounding off the pinion nut. Unthread the nut by turning the entire driveshaft counter-clockwise (as viewed from above).
  IMPORTANT: You are only "loosening" the nut a couple of turns at this time. If you turn too much, the driveshaft will lift up and jam. The next step will allow you to completely remove the pinion nut and driveshaft.
  Now it's time to loosen the pinion nut on the bottom of the driveshaft. Insert your Pinion Nut Adaptor Wrench as so it fits properly onto the pinion nut. You might have to lift the driveshaft and turn until it goes into place. 
  This next part is tricky. Place the Drive Shaft Nut Wrench on the top splines of the driveshaft and get a large wrench to fit it. IF you attempt to unthread the nut by turning the shaft, the nut will spin in the lower tool. This will round off the nut and open a can or worms. Before unthreading the nut, take your propshaft bearing carrier (the thing you pulled out earlier), 
  reverse it around and slide it over the propshaft and into the case backwards. This will hold the propshaft firm and reduce the chance or you rounding off the pinion nut. Unthread the nut by turning the entire driveshaft counter-clockwise (as viewed from above).
  IMPORTANT: You are only "loosening" the nut a couple of turns at this time. If you turn too much, the driveshaft will lift up and jam. The next step will allow you to completely remove the pinion nut and driveshaft. Slide your Driveshaft Bearing Retainer Wrench down over the driveshaft and unthread the ring nut (counter-clockwise as viewed from above). Don't bother putting a wrench on the tool. Just smack it with a hammer in the correct direction and it will break the ring nut loose. 
  Unthread the ring nut and lift it up and out. Below the ring nut are shims and a bearing race. Remove both if you can. If not, don't worry about it. They will lift out when you are ready to remove the driveshaft. Don't loose the shims. Take note of the assembled order so you can remember how all this goes back together.
  Slide your Driveshaft Bearing Retainer Wrench down over the driveshaft and unthread the ring nut (counter-clockwise as viewed from above). Don't bother putting a wrench on the tool. Just smack it with a hammer in the correct direction and it will break the ring nut loose. 
  Unthread the ring nut and lift it up and out. Below the ring nut are shims and a bearing race. Remove both if you can. If not, don't worry about it. They will lift out when you are ready to remove the driveshaft. Don't loose the shims. Take note of the assembled order so you can remember how all this goes back together. Finish unthreading the pinion nut by rotating the driveshaft and lifting up. Eventually the shaft will lift right out.
  Finish unthreading the pinion nut by rotating the driveshaft and lifting up. Eventually the shaft will lift right out.  The pinion gear is now loose in the case. Usually we tilt the drive back in the stand and jiggle the propshaft back and forth. Then the pinion gear and nut falls right out of the case into your hand.
  The pinion gear is now loose in the case. Usually we tilt the drive back in the stand and jiggle the propshaft back and forth. Then the pinion gear and nut falls right out of the case into your hand. Now you can remove the propshaft along with the attached clutch and forward gear assembly. To remove the shaft, cock it off to the left side, jiggle and pull. Careful not to loose any of the lower driveshaft bearing needles should they drop out of place.
  Now you can remove the propshaft along with the attached clutch and forward gear assembly. To remove the shaft, cock it off to the left side, jiggle and pull. Careful not to loose any of the lower driveshaft bearing needles should they drop out of place. STOP and INSPECT. You need to look things over and see if it's worth it to proceed. Give the case a full inspection. If you had a gear failure, it might have damaged the housing. Inspect very closely for holes or "dimples" in the case. They might be leaking to the outside. 
Usually if the gears are bad and the case is bad it isn't worth rebuilding. Usually if the gears are bad and both shafts are bad it isn't worth rebuilding. 
 The next step can ruin your housing so follow both these instructions and your Service Manual instructions carefully.
  STOP and INSPECT. You need to look things over and see if it's worth it to proceed. Give the case a full inspection. If you had a gear failure, it might have damaged the housing. Inspect very closely for holes or "dimples" in the case. They might be leaking to the outside. 
Usually if the gears are bad and the case is bad it isn't worth rebuilding. Usually if the gears are bad and both shafts are bad it isn't worth rebuilding. 
 The next step can ruin your housing so follow both these instructions and your Service Manual instructions carefully. Now it's time to knock out the lower driveshaft needle bearing. Thread the proper driver head onto the driver rod. The bearing will be knocked out from above (hit down from above). Before the bearing can be removed, the
  needles need to be in place. When the bearing gets worn, the needles fall out easily. The needles need to be put back into the race. Grease them up with thick grease and put each needle into place one-by-one. The last needle will be hard to "snap" into place but it will go. 
  Now that all the needles are back in place, lower the driver tool down into the case from above and make sure the driver head fits down against the top of the needles... NOT the bearings race. In other words, you will be hammering the tool down onto the top of the needles. Hold the handle of the tool straight up and steady while you tap with a dead blow hammer. Hopefully the entire bearing assembly will drop down into the housing and your done.
   Sometimes the bearing shell cracks. If the bearing shell cracks, it will be stuck in the housing and the housing will be unusable. A cracked lower bearing will ruin the case.   If the bearing race/shell has cracked in the case you should seriously condenser buying a complete factory remanufactured Alpha One for about $2900.00
  Now it's time to knock out the lower driveshaft needle bearing. Thread the proper driver head onto the driver rod. The bearing will be knocked out from above (hit down from above). Before the bearing can be removed, the
  needles need to be in place. When the bearing gets worn, the needles fall out easily. The needles need to be put back into the race. Grease them up with thick grease and put each needle into place one-by-one. The last needle will be hard to "snap" into place but it will go. 
  Now that all the needles are back in place, lower the driver tool down into the case from above and make sure the driver head fits down against the top of the needles... NOT the bearings race. In other words, you will be hammering the tool down onto the top of the needles. Hold the handle of the tool straight up and steady while you tap with a dead blow hammer. Hopefully the entire bearing assembly will drop down into the housing and your done.
   Sometimes the bearing shell cracks. If the bearing shell cracks, it will be stuck in the housing and the housing will be unusable. A cracked lower bearing will ruin the case.   If the bearing race/shell has cracked in the case you should seriously condenser buying a complete factory remanufactured Alpha One for about $2900.00| ©2004 Sterndrives.Com Email  About Us  Home  Return Policy |  Mercruiser Help  Shop Manuals  Search  Contact |